Easy and Free Ways to Record a Synthesizer
Synth pads are an iconic sound in electronic music, and can be a very valuable tool for any music producer looking to add atmosphere and depth to a song.
I've put this guide together to teach you how to use a synth pad by covering how to make, record, and mix them.
By following this guide, you'll also learn why a synth pad is called a synth pad, how an envelope generator works, and how to use a synth pad in your song.
- Padding out your sound
- Synth Pad Recipe
- Envelope settings for a synth pad
- A quick explanation of ADSR
- Making a pad on a mono synth
- Experiment with effects
- Envelope settings for a synth pad
- Recording your synth pad
- Record the "dry" signal
- Record in Mono
- Leave plenty of headroom
- Mixing a synth pad
- EQ your synth pad
- Add your effects
- Volume and panning
- Summary
Padding out your sound
Let's first understand what a synth pad is and how they got their name.
The term "pad" comes from the English term "pad out", which means to add more of something to make something else seem more substantial. For example, you could "pad out" an essay by adding some extra words.
This is exactly what a synth pad does: it pads out the track by adding extra harmonic information to create a fuller sound by filling out any frequency gaps in a song.
A synth pad will always play long, sustained notes that blend into one another. These are almost always some form of chord, but they can occasionally also be a single note, such as a drone.
Synth pads have even evolved beyond their initial function of just filling out a track, and can be used to make songs in their own right. This is most clearly seen in the ambient music genre, that takes these rich and textured pads to create luscious, textured soundscapes.
Synth Pad Recipe
Making a synth pad is simple and can be achieved with most synthesizers. You will need to adjust your envelope settings to have a long attack and release, and a mid decay and sustain. Adding effects such as chorus and reverb will also add extra texture to your sound.
I recommend using a poly synth for synth pads as you can get richer harmonies by using the multiple voices to form chords. Having said this, you can make synth pads with mono synths in some instances.
Envelope settings for a synth pad
To get the core sound of a synth pad, you will first need to adjust the synthesizers envelope generator settings.
A quick explanation of ADSR
The Envelope Generator (EG) is how the sound is processed by the synthesizer and delivered to the speaker, most commonly using Attack, Decay, Sustain, and Release (ADSR).
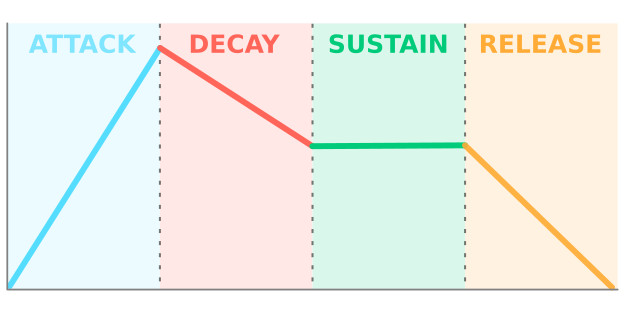
- Attack: This means the time taken to make the sound. A lower setting means the sound reaches its maximum volume quicker, a higher setting means that the sound will take longer to reach its max volume.
- Decay: This means how quickly the sound declines in volume. A lower setting means the sound declines in volume quicker, a higher setting means that it takes longer.
- Sustain: This is the level of the sound the decay will decline to. Whilst the other settings measure time, this setting measures level. A lower setting means a quieter volume, a higher setting means a higher volume.
- Release: This is the time taken from the sound to reach silence once the key is released. A lower setting means a quicker decline in volume, a higher setting means it takes longer for your sound to reach silence.
To make a synth pad, start with the following envelope settings:
- Attack: Set to 75%
- Decay: Set to 60%
- Sustain: Set to 50%
- Release: Set to 70%
This will make a simple pad that will both fade in and ring out, blending chords seamlessly together to create a wash of sound.
Try adjusting these settings to find a synth pad that sounds right for you.
Making a pad on a mono synth
Making a synth pad is best done on a poly synth, but can be done on a mono synth if you have the right settings available. You'll need a mono synth with multiple oscillators that can be tuned independently of each other (for best results) or atleast a "detune" function.
If you have a mono synth that can tune multiple oscillators, tune each oscillator to create a simple chord. For example, in a 3 oscillator mono synth, tune the 2nd and 3rd oscillators to a 3rd and 5th note respectively to make a major chord.
For a mono synth with a detune function, apply the detune very slightly. This will detune the oscillators with each other which will thicken up your sound. Be careful though, as adding too much detune will create a muddier sound, so it's best used sparingly.
Experiment with effects
Adding effects to your synth pad is a great way to make it sound more atmospheric and ambient.
I always recommend adding a little bit of chorus and reverb to give the pad some more width and space in the mix.
Other effects, like phasing or adding an LFO to your filter, can also give the synth some movement, which will make it more interesting to the ear.
Again, any effect on your synth pad should be subtle as you don't want the pad to stand out in the final mix.
Once you've found your sound you'll want to turn off your effects before recording. This will make it a lot easier to mix with, which I'll cover fully in the next section.
Recording your synth pad
Now it's time to connect your synth to a PC, and get recording!
As synth pads are designed to spread across your track, they can get unruly if not managed properly.
So, it's important to record a pad properly to make it easier for you when it comes to mixing.
Record the "dry" signal
As mentioned earlier, you'll want to record your synths "dry" signal. This means that you don't record with any added effects, so no chorus or reverb. Just record the raw sound from your synth, and then add your effects in post production.
This will make it a lot easier to mix as you can adjust the amount of post-production effects, whereas you're stuck with any effects that have been recorded in!
Top tip: Your DAW should have plenty of effect plugins available. If not, I recommend picking up the "MFreeFXBundle" from MeldaProductions as it contains a wide range of effects for free.
Record in Mono
First, be sure to record your synth pad in "mono" as opposed to "stereo". This isn't the same "mono" as in "mono and poly", it means that there will only be one signal recorded for both the left and right channels.
This makes it a lot easier to mix, as you have more control over where it is placed. Don't worry if it sounds a little flat right now, this will be fixed later in post production.
If you can't record in mono for any reason, then add a plugin to your synth channel to make the channel mono.
Leave plenty of headroom
Be sure to leave some headroom on your channel to make sure you're not going to distort or "clip" when recording. This is true for recording any type of instrument.
If you are recording a hardware synth pad, I recommend recording so your synth pads average volume is between -12dBFS and -18dBFS, with a true peak no higher than -6dBFS.
If you're recording a software synth pad, you can record with a louder signal (called recording "hotter") any adjust afterwards, but I still recommend keeping the true peak below -6dBFS.
Mixing a synth pad
Now you've recorded your synth pad, you just need to make a few post production adjustments to mix it with your other tracks.
I recommend mixing your synth pad after all other instruments. As the synth pad is designed to "pad out" the sound, it'll be easier to do once you know which frequency gaps need filling.
EQ your synth pad
Equalisation (EQ) is very important for synth pads. The aim is to reduce the frequencies that are already occupied by other instruments and to fill out the areas where there are gaps.
To EQ your synth pad, first use a spectrum analyzer to identify the other frequencies occupied. If you haven't recorded anything else yet, move on and come back to this afterwards.
Make a note of where most frequencies are occupying, and add an EQ plugin to your synth pad. Make subtle cuts of between -3dB and -6dB where most frequencies are.
Next, remove the low end frequencies on your synth pad by applying a high pass filter. I would recommend removing anything below 200Hz, as these frequencies will just be taking up headroom.
Add your effects
Now you can add your effects to your synth pad.
As mentioned, it's always best to add them to the recorded dry signal, as it makes mixing a lot easier.
The key to adding effects to a synth pad is to be subtle. In most cases, the synth pad shouldn't stand out. A subtle application of an effect can really enhance your sound and give it some more atmosphere.
To add an effect to your synth pad in post production, drag and drop the effects plugin onto the synths channel.
If you're going to be using the same effects across different instruments and want to save processing power, you can use designated effects busses.
I recommend using the following effects on the synth pad channel, in the order listed:
- Chorus: This will make copies of your track with very slight differences and layer them together. The result will be an instantly recognisable, spacey tone. It's best to use a subtle amount, as too much can easily ruin your sound. This should come first in the effects chain.
- Stereoize: Next, add a plugin to stereoize your synth pad. This creates width to your synth pad by creating an identical copy of your synth signal and rapidly plays it between your left and right channels, which fills up more room. Again, a little goes a long way.
- Auto-pan: Adding an auto-pan plugin will move your synth pad between the left and right channels, making it sound like it's moving. I recommend using a very slow setting, at less than 20% of the signal. This will keep your synth mostly in one place, but move some of the signal around.
- Reverb: Finally, add a little reverb to give your synth pad some extra breath. It will make it more ethereal and provide a more natural decay to it.
All of these effects are optional, and I recommend playing around with them to decide what you like. Ultimately, the only rule is to use what sounds good to you!
Volume and panning
Lastly, you'll need to adjust the volume and panning of your synth pad. In most instances, you'll want the synth to sit in the background and support the track.
The volume is entirely dependent on the other instruments of the track. You'll need to trust your ears to find the right level.
As mentioned, I usually use an auto-pan plugin to move the signal between the left and right channels, so I tend to keep the synth channel panned close to centre. If you're not using an auto-pan plugin, then use a stereo analyser to find the gaps in your stereo mix and pan your synth pad accordingly.
Summary
After reading this article, you'll now have a better understanding of what a synth pad is and how to create, record, and mix with them.
Used correctly, a synth pad can be a powerful tool that can take your mix to the next level. Used incorrectly, and you can easily cloud your mix.
The key to a good synth pad is subtlety, simplicity, and fitting it around your mix.
Source: https://www.roundtableaudio.com/synth-pads-how-to-make-record-and-mix-them/
0 Response to "Easy and Free Ways to Record a Synthesizer"
ارسال یک نظر